Masterclass: Learn to Design Enamel Pins by Artist Jennifer Hawkyard
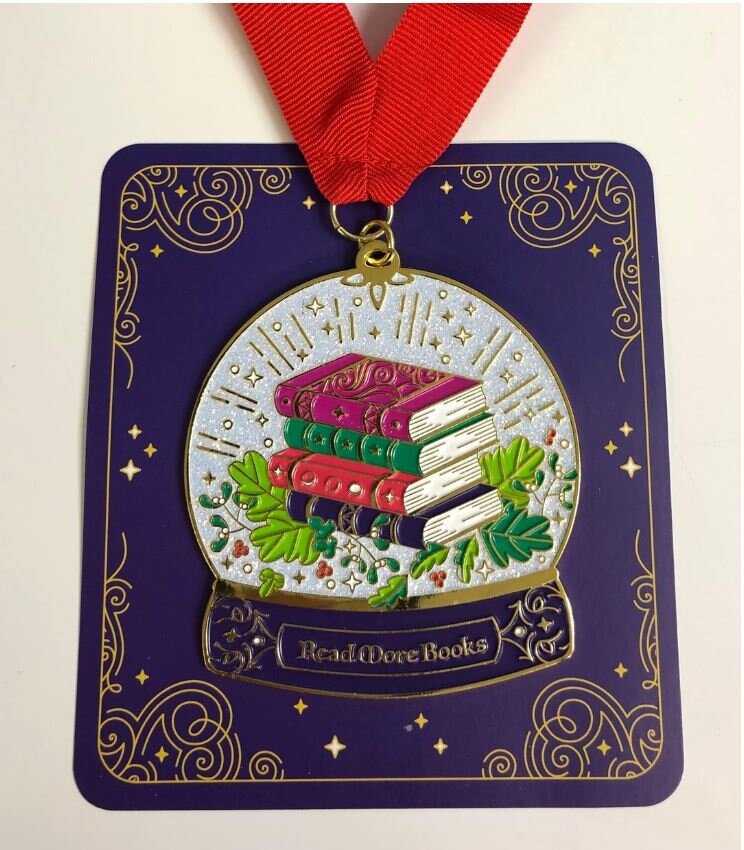
A large custom enamel creation designed for Wick and Fable for their subscription box by Jenny Hawkyard
Image Credit: Fabledmerch
Meet the Artist: Jennifer Hawkyard

Jennifer Hawkyard is a multi-disciplinary artist living and working in remote West Wales.
She is a traditional and digital illustrator, fine artist, and professionally trained Art Director and Graphic Designer. She is known for her colourful, vibrant, and highly textural images that span a wide range of subject matter and medium.
Check Jennifer’s shop and studio here.
Website: www.jezhawk.com
Jennifer’s enamel pin design journey:
Jennifer started designing enamel pins when she created artwork which she thought was particularly suitable to convert into pins. She did a Kickstarter to raise funds for her first enamel pin project based on her animal totem artwork. Her campaign was a success, and since then there has been no looking back. She creates custom enamel pin designs for themed subscription boxes of various book merch companies such as Fabled Merch and Fairy Loot.
Jennifer enjoys creating pins for Young Adult fiction books, especially ones with fantasy-themed worlds.
Enamel pin design: Jennifer’s 4-step process
Design Step 1: Freehand Sketch based on client concept
Jennifer’s pins begin as a rough sketch in her sketchbook. While designing, she thinks about the concept as shared by the client as well as the physical restraints of enamel pins. For example, the design can’t be too complicated as the metal framework surrounding the pins can’t be very thin (0.6pt line weight or thicker).
If there is a typography element in the pin, Jennifer creates designs that will be legible in metal/enamel.
The challenge is to convey the intricacies of the design within the limitations.

Enamel Pin Design Step 1: Freehand Sketch in Sketchbook
Image Credit: Jenny Hawkyard

Jenny's enamel pin design sketch with color options.
Image Credit: Jenny Hawkyard
Design Step 2: Recreating hand-drawn sketch in Photoshop
Next, Jennifer recreates the hand-drawn sketch in Photoshop on her computer, using a Wacom Cintiq tablet (with a creative pen display). The lines on the digital illustration at this stage dictate where the metal framework of the pin will be. She uses Affinity Designer (a vector design program) and begins to convert the sketch to a vector outline
Jennifer then sends the first draft of the pin design to her client with rough notes on colour and other embellishments.

Enamel Pin Design Step 2: Converting the enamel pin design sketch into a vector outline using Affinity Designer
Image Credit: Jenny Hawkyard
Enamel Pin Design Step 3: Visualizing Colour Scheme
Jennifer visualizes and finds a colour scheme that will work with the design and aesthetics. She uses a Pantone Swatch book to ensure the colours are correct as they can look quite different on the screen from reality. She also decides whether the design will include glitter or glow in the dark elements.

Enamel pin design step 3: Color options with Pantone Swatch book
Image Credit: Jenny Hawkyard
Design Step 4: Client Approval and instructions to Manufacturer
She sends the artwork to the client again for final approval. Once there’s a go-ahead from the client, she finalizes the artwork. She adds notes to areas to make them clearer, mentions the dimensions in the design, and notifies the colours properly so that instructions are clear for the enamel pin manufacturer.

Jennifer shares some pro-tips:
“Keep your budget in mind before designing your pins!”
Know your budget. Figure out the size of the pin you would like to offer and approximate use of colours or other custom elements - these will all affect the final cost of the pins. Know how many you want to order - as naturally, the more you order, the cheaper they get. Once you have a budget in mind, then you can create a design that works to your budget - there’s no point in designing a super complex pin if you can’t afford to get it made.
It’s super useful to always refer to the actual size of the pin when designing. It’s easy to be zoomed in on a design and think that it all is legible and readable and then zoom out to actual print size and find that the manufacturer will struggle to capture the level of detail.
It’s essential to get a Pantone booklet if you can afford one - if you plan to do multiple pins or make a business of pin design then ensuring colour accuracy will make sure your designs come out exactly as planned.
A big believer in embracing design challenges, Jennifer says that when designing pins, you’re dealing with flat colour and flat design that must be surrounded by a metallic framework. So those are your constraints - not to mention the budget considerations. But that’s what’s fun is trying to come up with a compelling design that also works within those constraints and looks epic as well!
Did you get ideas on how to design your enamel pins? Do you have any tips to share with our readers? Let us know in the comments section below!
At Gumtoo, we can help you design and manufacture enamel pins for your brand. Get in touch with us at sales@gumtoo.ca.