What is the difference between 180-degree and 360-degree dye sublimated socks?
Which type of custom socks should you pick for your brand? 180-degree dye sublimated socks or 360-degree dye sublimated socks? What is the difference? Are they the same as printed socks? Learn more.
The dye sublimation process involves creating a deep print of your design onto the sock’s fabric with heat transfer. Using this process, you can get socks with rich details of your design and long-lasting images with vibrant colors.
Dye sublimated socks are also called printed socks.
180-degree dye sublimated socks:

180-degree dye sublimated socks
Image via Firebirdsocks
In 180-degree dye sublimation, the design can be printed onto the front of the socks or back or both. If you want the design on the side of the socks, it will stagger and you will be able to see the side seams.
180 sublimation socks are normally made with polyester.
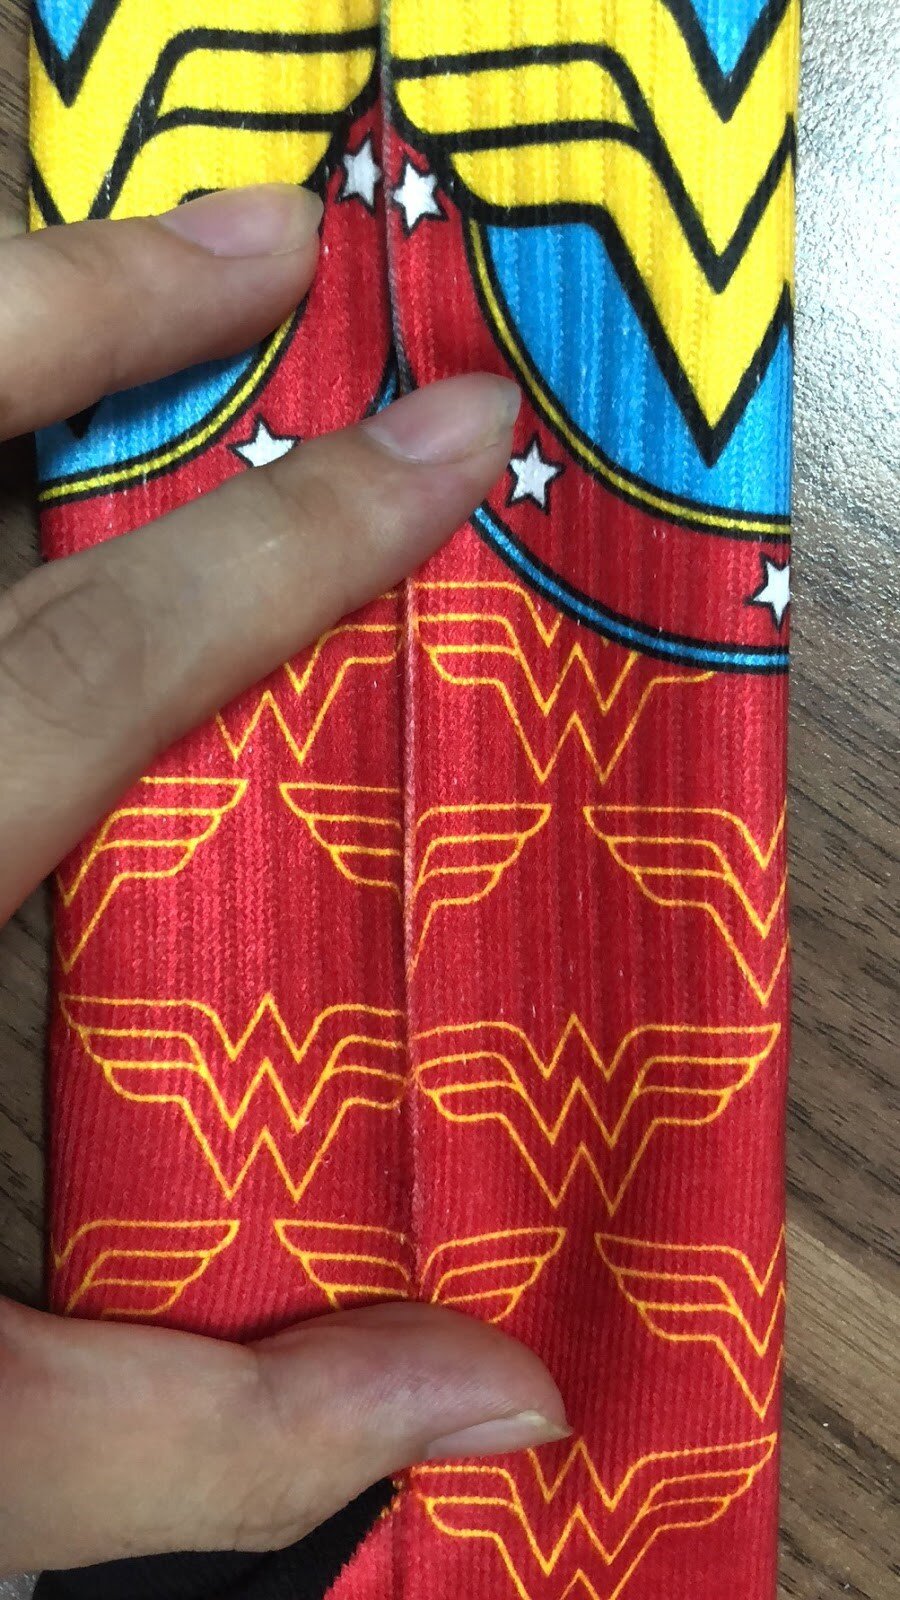
Seams visible on a 180-degree dye sublimated sock
360-degree dye sublimated socks:

Seamless printing of design through 360-degree dye-sublimated socks
Image via Sockdreams
360-degree printing is an upgrade to the dye-sublimation process. It allows you to design a sock that has the graphics covered almost seamlessly. It enables greater color permeability, and even when the socks are stretched, the image looks great. There are no ‘white gaps’ in the socks when you use this method.
360 sublimation socks can be made with different materials such as a blend of polyester, cotton, spandex, etc. This makes the socks have a better stretch as compared to 180-degree sublimated socks which are made of 100% polyester.
Also, 180-degree socks lose shape more easily after multiple washes as compared to 360-degree socks
Both 180 and 360-degree socks are printed on a white base.
Cost: 180-degree vs 360-degree dye sublimated socks
“Printed using special machines which ensure that the design is all over the socks, 360-degree printed socks are more expensive than 180 degree printed socks”
The Verdict
Pick 180-degree socks when:
You have a design that can’t be knitted directly onto the sock fabric.
You are on a tight budget but want colorful printed socks.
You plan to give these socks as swag at universities/clubs, marathons, etc.
Pick 360-degree socks when:
You have a design that can’t be knitted directly onto the sock fabric. Your design is colorful and complex.
You need excellent quality printing on your socks, with no gaps to show.
You want the socks to offer a better stretch to the user.
You want the socks to be more durable and hold their shape even after multiple washes.
You plan to give these socks as corporate giveaways, in media swag bags, to clients, etc.
To know more about different types of sock fabrication, and the one that best suits your requirement, get in touch with us at sales@gumtoo.ca today.
Knock The Socks Off Your Employees With This Latest Gifting Trend
Impress your employees with branded custom socks-the latest addition in cool corporate swag. Read the top 4 reasons why you should use branded custom socks as a corporate giveaway.
Thinking of sending a swag kit to your work-from-home employees? Add some swagger to your corporate swag arsenal with branded custom socks. Why custom socks you ask?
Here are the top 4 reasons why you should give branded custom socks to employees as company swag:
#1 Always give custom swag that people want to keep and use:

Custom Socks for Employees in the new Work-from-Home Edition
Image via Pinterest
Remember the custom pen that you got at the last trade show (before the pandemic) that you attended?
No?
Well, that’s exactly our point. When you are investing your money in giving out custom gifts, why not give something which people will use and remember. As far as we know, everyone wears socks! Some wear it with sliders or home sneakers or just socks without footwear for the warm fuzzy feeling only socks can give.
And, we can credit Canadian PM Justin Trudeau for the revival of socks as a fashion item. Quirky, colorful socks are on-trend, replacing boring neck-ties. What better time than to jump on this fashion bandwagon and incorporate your branded custom swag into the everyday lives of your employees?
#2 One pair of branded custom socks=Multiple branding uses:

Vibrant Branded Custom Socks for Employees
Image via Moodydose
You can give out branded custom socks to employees as part of your new hire package, as trade-show giveaways, retail it on your company store, as part of corporate giveaways to clients, as part of a work-from-home care package, and as part of a virtual party hamper for your virtual employee events (the new normal).

Branded Custom Socks for Employees as part of Work-from-Home Care Package
Image via Theory Brand Agency
Here’s a fun idea:

Rolled up custom Christmas-themed socks as Christmas giveaways
Image via Pinterest
This Christmas, gift holiday-themed custom socks to your employees, along with other fun gifts. Run a social media campaign, asking your employees to wear your custom socks in the most creative ways they can think of (like a glove, wearing mismatched pairs-the custom one on foot, and another one on the other, wearing outrageous outfits with socks, as a replacement for Santa’s cap, as stockings for Christmas gifts, etc. )
P.S: Don’t give out these ideas, let your team get creative!
Get your employees to take funny pics of themselves wearing the socks and post them on your company intranet or send them to your Social Media Manager. The best and most quirky pictures make it to your official social media pages.
#3 Size doesn’t matter (much) when it comes to branded custom socks:
Of course, socks do come in various sizes. But unlike tees, you don’t need to get accurate measurements from employees on their sock sizes. We offer a standard unisex size that will fit most people. Zero hassles in ordering, maintaining your socks inventory, and distributing them to your employees.
Fun idea:
Take a poll. Ask your employees which sock length they prefer. Options are no show, quarter, crew, and knee-length. Order our standard size socks in the sock length preferred by most in your poll.
#4 You can get super-creative with socks’ designs:

Custom Socks with Awesome Designs and Vibrant Colors
Image via Linkedin
Ready to design and order branded custom socks for your employees as a corporate giveaway? Write to us at sales@gumtoo.ca today for an unbeatable quote!
Masterclass: Learn to Design Enamel Pins by Artist Jennifer Hawkyard
Artist Jennifer Hawykard shares her enamel pin design process and pro tips to help you design your own custom enamel pin.
A large custom enamel creation designed for Wick and Fable for their subscription box by Jenny Hawkyard
Image Credit: Fabledmerch
Meet the Artist: Jennifer Hawkyard

Jennifer Hawkyard is a multi-disciplinary artist living and working in remote West Wales.
She is a traditional and digital illustrator, fine artist, and professionally trained Art Director and Graphic Designer. She is known for her colourful, vibrant, and highly textural images that span a wide range of subject matter and medium.
Check Jennifer’s shop and studio here.
Website: www.jezhawk.com
Jennifer’s enamel pin design journey:
Jennifer started designing enamel pins when she created artwork which she thought was particularly suitable to convert into pins. She did a Kickstarter to raise funds for her first enamel pin project based on her animal totem artwork. Her campaign was a success, and since then there has been no looking back. She creates custom enamel pin designs for themed subscription boxes of various book merch companies such as Fabled Merch and Fairy Loot.
Jennifer enjoys creating pins for Young Adult fiction books, especially ones with fantasy-themed worlds.
Enamel pin design: Jennifer’s 4-step process
Design Step 1: Freehand Sketch based on client concept
Jennifer’s pins begin as a rough sketch in her sketchbook. While designing, she thinks about the concept as shared by the client as well as the physical restraints of enamel pins. For example, the design can’t be too complicated as the metal framework surrounding the pins can’t be very thin (0.6pt line weight or thicker).
If there is a typography element in the pin, Jennifer creates designs that will be legible in metal/enamel.
The challenge is to convey the intricacies of the design within the limitations.

Enamel Pin Design Step 1: Freehand Sketch in Sketchbook
Image Credit: Jenny Hawkyard

Jenny's enamel pin design sketch with color options.
Image Credit: Jenny Hawkyard
Design Step 2: Recreating hand-drawn sketch in Photoshop
Next, Jennifer recreates the hand-drawn sketch in Photoshop on her computer, using a Wacom Cintiq tablet (with a creative pen display). The lines on the digital illustration at this stage dictate where the metal framework of the pin will be. She uses Affinity Designer (a vector design program) and begins to convert the sketch to a vector outline
Jennifer then sends the first draft of the pin design to her client with rough notes on colour and other embellishments.

Enamel Pin Design Step 2: Converting the enamel pin design sketch into a vector outline using Affinity Designer
Image Credit: Jenny Hawkyard
Enamel Pin Design Step 3: Visualizing Colour Scheme
Jennifer visualizes and finds a colour scheme that will work with the design and aesthetics. She uses a Pantone Swatch book to ensure the colours are correct as they can look quite different on the screen from reality. She also decides whether the design will include glitter or glow in the dark elements.

Enamel pin design step 3: Color options with Pantone Swatch book
Image Credit: Jenny Hawkyard
Design Step 4: Client Approval and instructions to Manufacturer
She sends the artwork to the client again for final approval. Once there’s a go-ahead from the client, she finalizes the artwork. She adds notes to areas to make them clearer, mentions the dimensions in the design, and notifies the colours properly so that instructions are clear for the enamel pin manufacturer.

Jennifer shares some pro-tips:
“Keep your budget in mind before designing your pins!”
Know your budget. Figure out the size of the pin you would like to offer and approximate use of colours or other custom elements - these will all affect the final cost of the pins. Know how many you want to order - as naturally, the more you order, the cheaper they get. Once you have a budget in mind, then you can create a design that works to your budget - there’s no point in designing a super complex pin if you can’t afford to get it made.
It’s super useful to always refer to the actual size of the pin when designing. It’s easy to be zoomed in on a design and think that it all is legible and readable and then zoom out to actual print size and find that the manufacturer will struggle to capture the level of detail.
It’s essential to get a Pantone booklet if you can afford one - if you plan to do multiple pins or make a business of pin design then ensuring colour accuracy will make sure your designs come out exactly as planned.
A big believer in embracing design challenges, Jennifer says that when designing pins, you’re dealing with flat colour and flat design that must be surrounded by a metallic framework. So those are your constraints - not to mention the budget considerations. But that’s what’s fun is trying to come up with a compelling design that also works within those constraints and looks epic as well!
Did you get ideas on how to design your enamel pins? Do you have any tips to share with our readers? Let us know in the comments section below!
At Gumtoo, we can help you design and manufacture enamel pins for your brand. Get in touch with us at sales@gumtoo.ca.
Masterclass: Aline Lima Shares her Enamel Pin Design Process
Brazilian designer and illustrator, Aline Lima shares her design inspirations and her 5-step enamel pin design process.

Koi Fish enamel pins designed by artist Aline Lima
Meet the Artist:
Aline Lima

Based in Brazil, Aline is a graduate in Business Administration.
Passionate about design, she runs her own design and illustration services company called Limão Criativo.
With an experience of over 10 years in graphic design, Aline specializes in branding and visual identity.
Aline’s foray into enamel pin design:
Aline landed upon the idea of using enamel pins for a project with serendipity, while looking for inspiration. She found enamel pins lovely and bringing a sense of joy and nostalgia.
Aline loves drawing fish and representing movements in some way, geometric shapes are present in almost all her works. Nature, sounds, objects, family and love for her loved ones-all inspire her work.
Designing enamel pins: Aline’s process
Design Step 1:
Aline stresses the importance of a good briefing with her client. After she has understood the concept, she spends a lot of time looking for inspiration (on Behance and Pinterest mainly) and collecting all the ideas that fit in with the briefing. She then filters all the ideas till she narrows on an initial main idea.
Design Step 2:

Fish Enamel pin design using Adobe Illustrator
Aline loves to draw freehand and she sketches her main idea as an enamel pin design. Then she transfers the design digitally using a vectorization program such as Adobe Illustrator.
Design Step 3:
She then defines the colors, keeping in mind the metal material (usually in the shades of gold, silver, black and rose gold) of the pins. She tries different colour combinations till she gets what she likes the best. Aline highly recommends using Adobe Colour Wheel for getting colour combinations right.
Design Step 4:
She uses a mock-up tool (there are several free tools) to see how the project will look once it is complete.

Using mock-up tool to visualize how the pin will look
Design Step 5:
If Aline likes the look of the pin in the mock-up, she sends it to the client for approval.

Final Pin design sent to the client
(All image credits: Aline Lima)
What should one bear in mind while designing enamel pins?
“Take care not to include too many fine details in the enamel pin design, as they are likely to get lost in the molding or stamping process. Also, It is good to avoid using gradients in your design.”
We are sure you found Aline’s enamel pin design tips handy!
You can check her work on Behance and on Instagram.
At Gumtoo, we can help you design and manufacture enamel pins for your brand. Get in touch with us at sales@gumtoo.ca.
Meet the Artist: Polina Parygina talks about her Embroidered Patch Designs
Young and talented artist Polina Parygina from Russia talks about her design philosophy, and her award-winning embroidered design patch project.
To begin this week on an exciting note, we interviewed the young and talented designer Polina Parygina from Russia. We loved talking to her about design inspirations, her design process, and her award-winning embroidered patch collaboration with Adidas.
So, to brighten up your week, we present Polina’s interview just for you. Read on!
Meet the Artist: Polina Parygina

A graduate from the National Research University Higher School of Economics Faculty of Communication Design, Polina describes herself as a Jedi of Graphic Design and Illustration.
She takes inspiration from various artists, designers and design movements from multiple periods. Currently, she is inspired by posters of artist Anna Kulachek and HORT BERLIN.
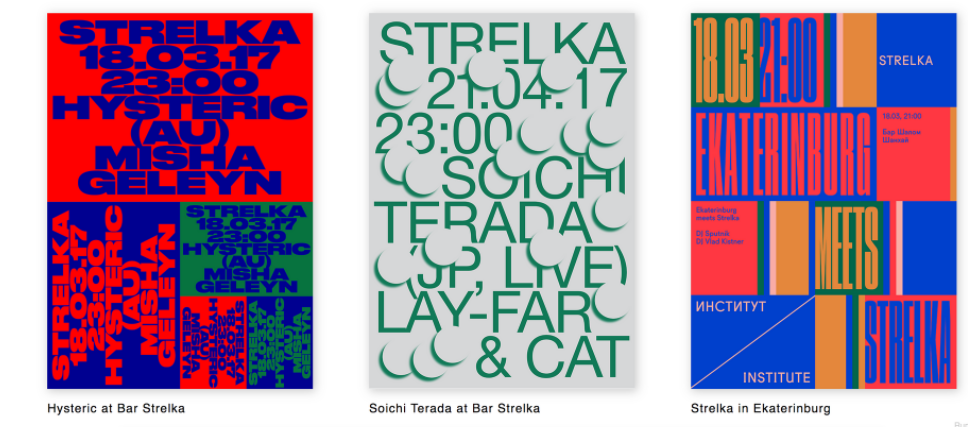
Artist Anna Kulachek’s striking posters for Strelka Institute
Cinema (esp. Stanley Kubrick), fashion, ecology, and the digital world are some of her other interests, which propel her to develop new ideas and designs.
Key Brand Collaborations: Fred Perry, Nike Moscow, SNC Magazine, Adidas Russia, Badoo, Esquire Russia, Natura Siberica.
Do check Polina’s designs on her Instagram page. You are sure to love it!
Polina’s foray into Embroidered Patch Design:
In her last year at university, Polina participated in a competition to create a patch for a collaboration between the brand Adidas and her university- the Higher School of Economics (HSE).
Historically, the bomber jacket has been a symbol for student fraternities and a sign of being a part of an elite educational institution’s sports team. This clothing item is a great example of the connection between sports and student life. The idea to make a bomber as a creative project is a logical start to the partnership between the sports brand — Adidas — and HSE.
-Rachel Howard, the Brand Director of Adidas Russia
Polina drew 6 designs of the patches for the bomber jacket, with her first design winning the competition. As a reward, she won a trip to Germany to the Adidas headquarters in Herzogenaurach!

Polina’s 6 design entries for embroidered patches on bomber jackets for Adidas x HSE

This stunning design won hands down
Check out the exciting behind the scenes video of Adidas x HSE bomber jacket contest here.
Embroidered patches for cycling race in collaboration with Fred Perry:
Enthused by her experience with embroidered patches, she designed a patch for a cycling race in Moscow, in collaboration with the brand Fred Perry.

Embroidered Patch Design for Fred Perry sponsored Cycle Race

Embroidered Patch for Fred Perry sponsored Cycle Race
This is how Polina’s Design Process looks like:

Which tools and techniques does Polina use to design Embroidered Patches?

iPad Procreate for Graphic Design
Polina uses Procreate app on her iPad Pro to work on designing embroidered patches.
“Do not use small design elements while designing patches. Avoid overwhelming designs.”
Did Polina’s embroidered patch design inspire you to start designing your own patches? Let us know in the comment section below!
To order custom embroidered patches, get in touch with us at sales@gumtoo.ca. We also provide patch design services.
(Image Credits: Polina Parygina)